The boards are designed to make it easy to blink an LED using digital pin 13. Some (like the Diecimila and LilyPad) have the LED built-in to the board. On most others (like the Mini and BT), there is a 1 KB resistor on the pin, allowing you to connect an LED directly. (To connect an LED to another digital pin, you should use an external resistor.)
LEDs have polarity, which means they will only light up if you orient the legs properly. The long leg is typically positive, and should connect to pin 13. The short leg connects to GND; the bulb of the LED will also typically have a flat edge on this side. If the LED doesn't light up, trying reversing the legs (you won't hurt the LED if you plug it in backwards for a short period of time).
Circuit
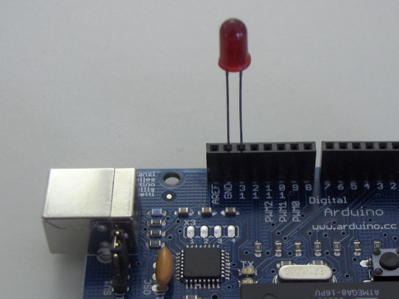
click the image to enlarge

Code
The example code is very simple, credits are to be found in the comments./*
Blink
Turns on an LED on for one second, then off for one second, repeatedly.
The circuit:
* LED connected from digital pin 13 to ground.
* Note: On most Arduino boards, there is already an LED on the board
connected to pin 13, so you don't need any extra components for this example.
Created 1 June 2005
By David Cuartielles
http://arduino.cc/en/Tutorial/Blink
based on an orginal by H. Barragan for the Wiring i/o board
This example code is in the public domain.
*/
int ledPin = 13; // LED connected to digital pin 13
// The setup() method runs once, when the sketch starts
void setup() {
// initialize the digital pin as an output:
pinMode(ledPin, OUTPUT);
}
// the loop() method runs over and over again,
// as long as the Arduino has power
void loop()
{
digitalWrite(ledPin, HIGH); // set the LED on
delay(1000); // wait for a second
digitalWrite(ledPin, LOW); // set the LED off
delay(1000); // wait for a second
}tags : Arduino, Blink, Pedro Ernesto Scotton, Pedro Scotton, Starter Arduino
Nenhum comentário:
Postar um comentário