Pitch follower using the tone() function
This example shows how to use the tone() command to generate a pitch that follows the values of an analog inputCircuit
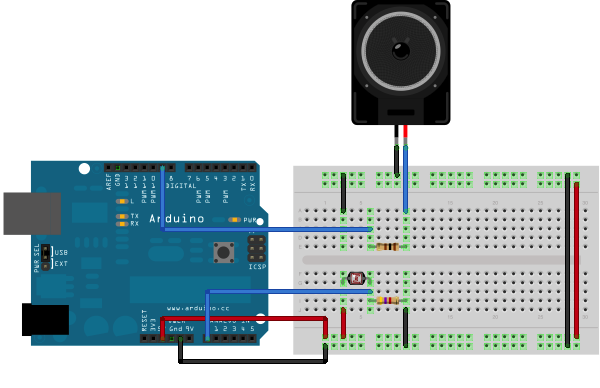
Schematic:
click the image to enlarge

Code
The code for this example is very simple. Just take an analog input and map its values to a range of audible pitches. Humans can hear from 20 - 20,000Hz, but 100 - 1000 usually works pretty well for this sketch.You'll need to get the actual range of your analog input for the mapping. In the circuit shown, the analog input value ranged from about 400 to about 1000. Change the values in the map() comand to match the range for your sensor.
The sketch is as follows:
/*
  Pitch follower

 Plays a pitch that changes based on a changing analog input

 circuit:
 * 8-ohm speaker on digital pin 8
 * photoresistor on analog 0 to 5V
 * 4.7K resistor on analog 0 to ground

 created 21 Jan 2010
 by Tom Igoe

This example code is in the public domain.

 http://arduino.cc/en/Tutorial/Tone2

 */


void setup() {
  // initialize serial communications (for debugging only):
  Serial.begin(9600);
}

void loop() {
  // read the sensor:
  int sensorReading = analogRead(0);
  // print the sensor reading so you know its range
  Serial.println(sensorReading);
  // map the pitch to the range of the analog input.
  // change the minimum and maximum input numbers below
  // depending on the range your sensor's giving:
  int thisPitch = map(sensorReading, 400, 1000, 100, 1000);

  // play the pitch:
  tone(8, thisPitch, 10);

}
fonte : http://arduino.cc/en/Tutorial/Tone2 tags : Arduino, Pedro Ernesto Scotton, Pedro Scotton, Pitch follower using the tone() function, Starter Arduino

Nenhum comentário:
Postar um comentário